Getting Started With CUDA on Windows
“You cannot always control what goes on outside.
But you can always control what goes on inside.”
— Wayne Dyer
Prologue
“CUDA® is a parallel computing platform and programming model developed by NVIDIA for general computing on graphical processing units (GPUs). With CUDA, developers are able to dramatically speed up computing applications by harnessing the power of GPUs.”
— CUDA Zone
Nowadays, GPU is no longer exclusive to video games. Parallel computing, Artificial Intelligence, and many other areas also embrace GPU to improve performance. To harness such power, one must have a general-purpose GPU (GPGPU) with CUDA.
CUDA is short for Compute Unified Device Architecture.
In this article, I’ll talk about the installation of CUDA on Windows, and give a demo of a CUDA program with Visual Studio and optionally CMake.
1. Setting up CUDA®
1.1 Checking for Compatibility
Hold your horse! Before everything, you must ensure that your computer is compatible with CUDA. So how do you check it?
First, check if you have an NVIDIA GPU. If not, unfortunately, you are shunned by CUDA.
Then, check if your GPU supports CUDA or not. You can open Device Manager to check your NVIDIA version, then go to NVIDIA Developer to see the compute compatibility. You should check the “CUDA-Enabled GeForce and TITAN Products” section for common laptops. I think all GeForce series GPUs are compatible.
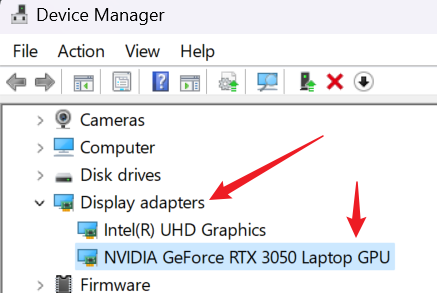
You can use Win + R to open Run, and use devmgmt.msc to open Device Manager.
1.2 Getting Ready with Visual Studio
One more thing. Before you install the CUDA Toolkit, you should have Visual Studio ready, because it will add configuration for it. Just install the community version from the official page. You should at least select “Desktop development with C++” with individual components of Clang and CMake.
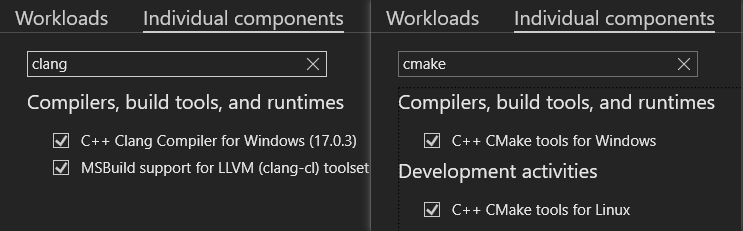
CUDA seems to depend on Clang, so we’ll see it again real soon.
1.3 Installing CUDA Toolkit
Like any other tool, you need the runtime to write a CUDA-enabled program. For this, you can download NVIDIA® CUDA® Toolkit. On the page, click download, and select the configuration based on your PC. Here, a network installer is recommended if you don’t need every component.

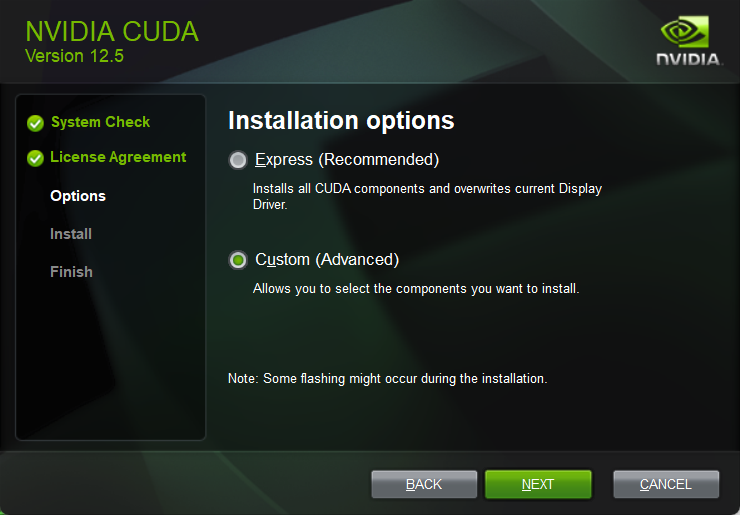
During the installation, there’s something for you to notice. First, if you worry about your system drive (e.g. C:\), or don’t want a full installation, select Custom so that you can choose what and where to install.
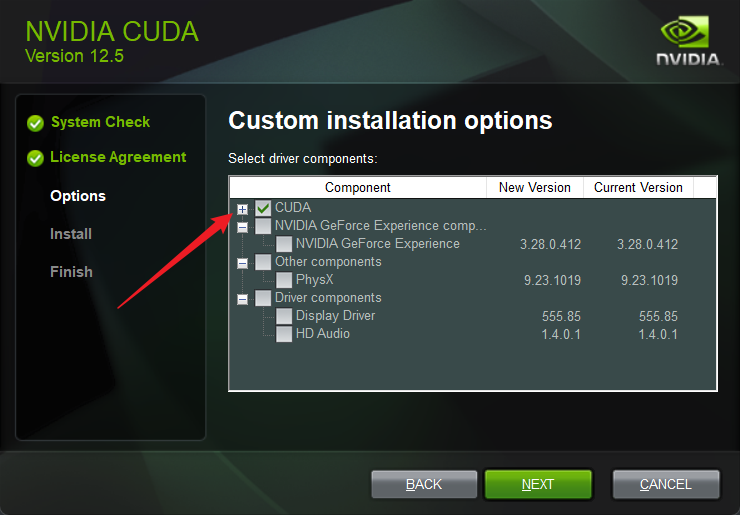
Then, for installation options, make sure you check CUDA. For the other three, if you previously have GeForce Experience, you may already have installed the latest PhysX and drivers. Anyway, you can take this chance to upgrade them though.
After this, just wait for the installation to complete. There shouldn’t be any problems.
1.4 Installation Verification
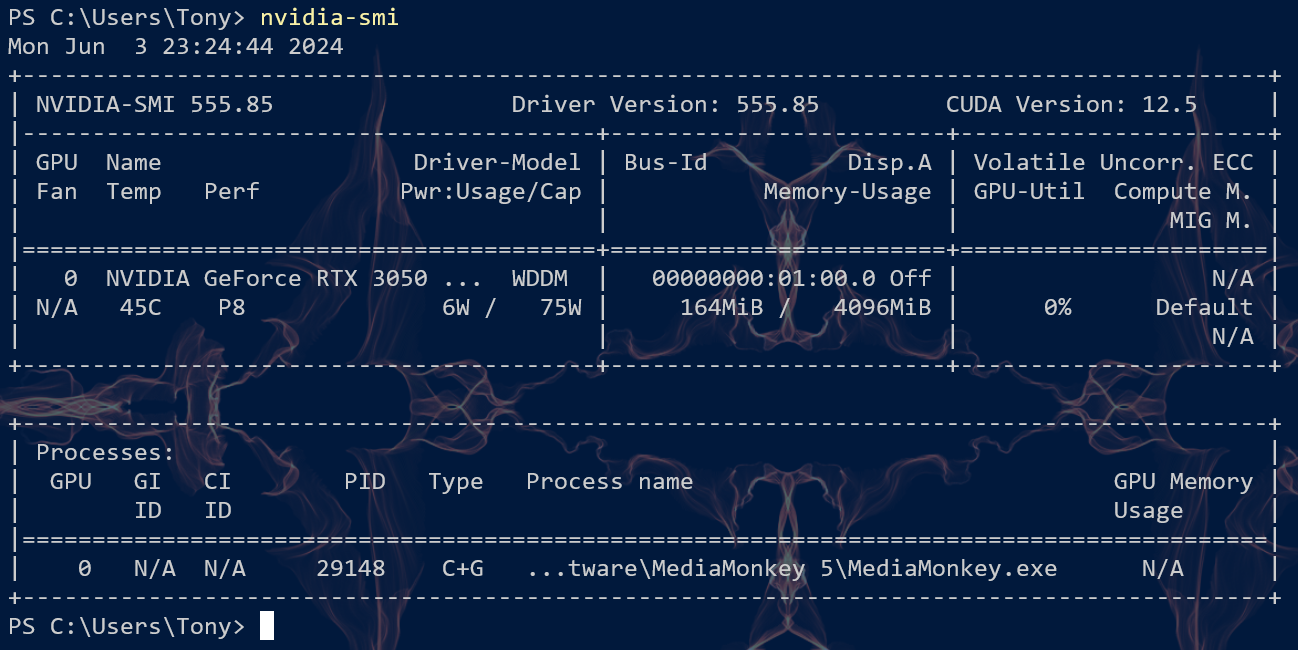
After installation, you can just open the Command Prompt or PowerShell to check your CUDA environment.
You can use nvidia-smi or nvidia-smi.exe to view your GPU information.
Then, you can use nvcc --version to see if the compiler for CUDA is ready to go.
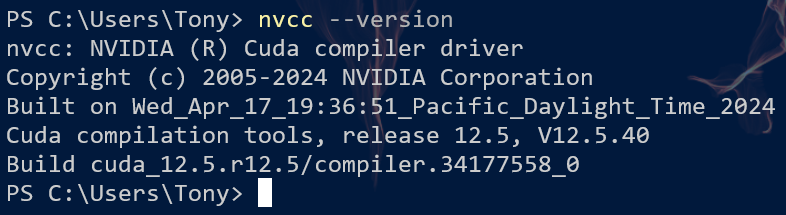
There is a potential problem here, for which nvcc won’t be able to compile the source code. I will discuss this later when we write the first CUDA program.
2. Your First CUDA Program
2.1 CUDA Source File
CUDA is essentially a wrapper for C/C++. So the program you write is no different from regular C/C++, only a few new functions. Corresponding to .h and .c/.cpp, the CUDA-enabled source files have extensions of .cuh and .cu.
Below is a simple demonstration of a CUDA program. You can see we include a new header file, a strange __global__ macro, and a weird <<< >>> syntax. Oh, and there seem to be some variables from nowhere.
1 |
|
So, let’s break them down one by one.
cuda_runtime.h: The runtime library header file for CUDA, including all you need.__global__: I think it’s some sort of annotation for CUDA to identify a function which is invoked on CPU, but runs on GPU.<<< >>>: Angle triplet, to specify execution configuration for a GPU call. It includes the number of blocks and the number of threads in each block.
For more information on execution configuration, please refer to Execution Configuration.
There’s much to learn for CUDA programming, but it’s not the point for now. 😶
2.2 Run!
Now, it’s the most exciting moment! We’re going to compile and run our first CUDA program. So first, make sure you have the .cu program saved to your disk, assume it is called demo.cu. nvcc has similar options as gcc, so run the following command, and see the GPU magic! 🪄
1 | PS:> nvcc.exe .\demo.cu -o demo.exe |
Tada! 🎉 It works!
Wait a second, I run into an error about cl.exe. 😭 In this case, you can refer to Missing cl.exe in Troubleshoot.
3. CUDA with Visual Studio
3.1 MS Solution
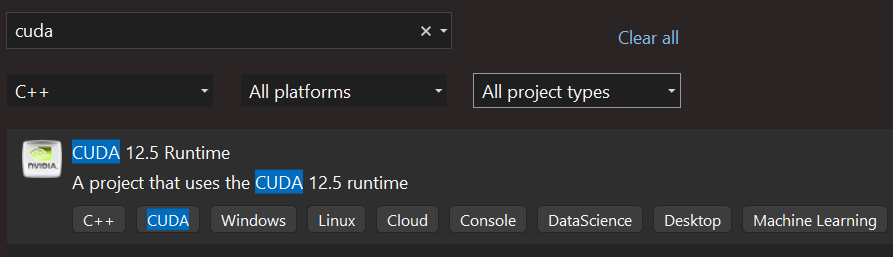
After you install the CUDA Toolkit, there will be new templates for Visual Studio. You can create a new CUDA project by selecting CUDA under C++ in the New Project dialog. After that, you’ll have a default CUDA program, hit Ctrl + F5 to run it.
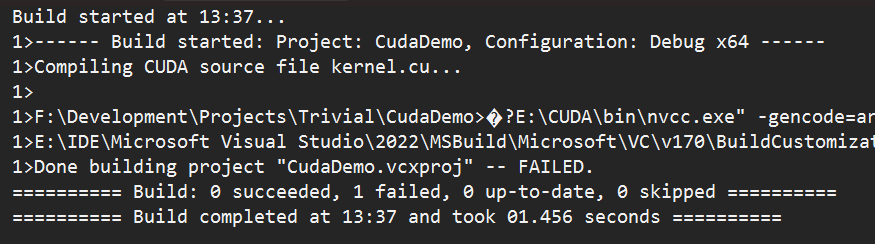
I don’t know why, but it can’t work for me. There seems to be some problem with the build command. Attempts to run the command in the integrated Developer PowerShell also failed. For the solution, you can refer to Access Violation in the Troubleshoot section.
If you too encounter this error, I suggest you use CMake instead.
I use Visual Studio 2022 Preview, so I suppose it’s a BUG or incompatibility?
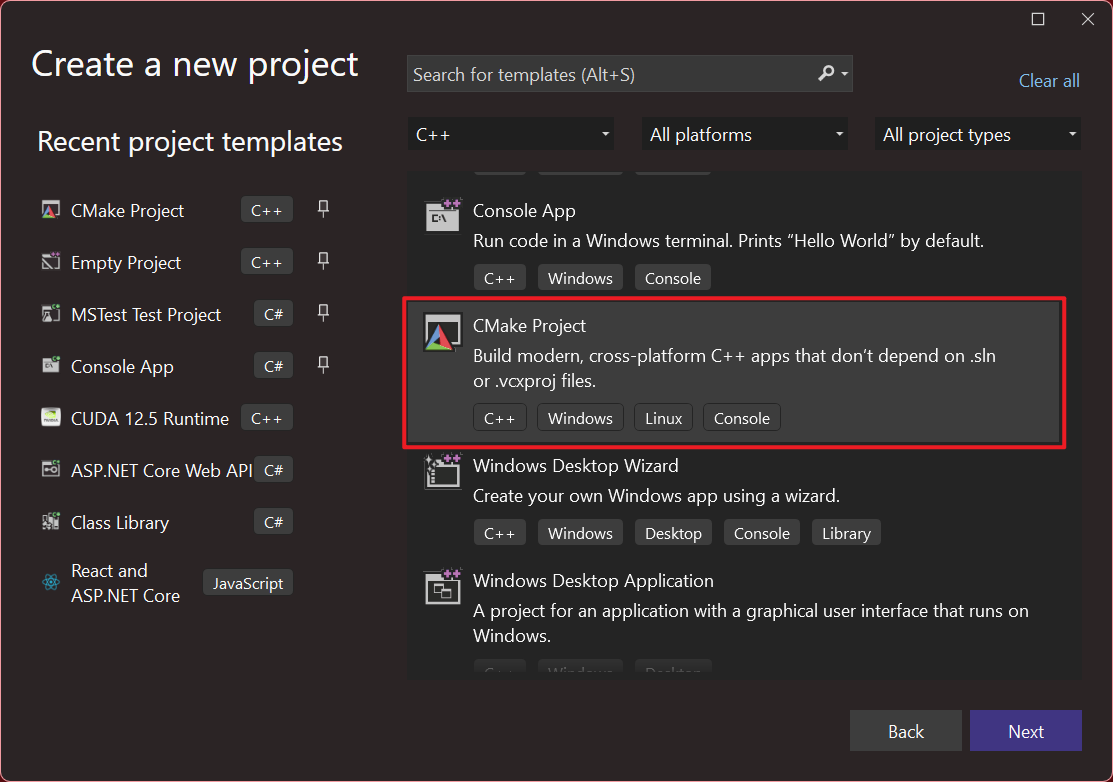
3.2 CMake
Well, for CMake, it’s not necessary to use Visual Studio. You can use any IDE or editor you like, even the command line. Here I just use Visual Studio as an example.
The source code for this CMake project can be found on GitHub at CudaCMakeDemo.
To build CUDA programs with CMake, create a new CMake project first. Well, in this case, you won’t get a default CUDA program, so you may use the one we’ve got in the previous section.
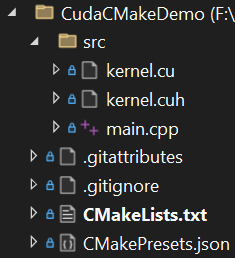
For a simple CMake project, you don’t need the nested folder, so you can delete it and reorganize the files. Here, suppose we put all source files in the src folder. For demonstration, I try to use as many kinds of extensions as possible. It’s ok to only have one .cu file.
Then, you can copy the following code to overwrite your CMakeLists.txt file.
1 | cmake_minimum_required (VERSION 3.8) |
One thing to notice is that, although .cu or .cuh files are C/C++ in essence, you can’t just use .c/.cpp extensions. On the one hand, IntelliSense won’t recognize syntax like <<< >>>, on the other hand, nvcc won’t do pre-processing for .c/.cpp files so the compilation will fail. So, you have to use .cu or .cuh for source files that contain CUDA code. However, CUDA types and functions can be used in .c/.cpp files.
Now, save the CMakeLists.txt and Visual Studio will generate the CMake cache for you. After that, hit Ctrl + F5 to compile and run the program! 🎉
Troubleshoot
Missing cl.exe
If you directly run nvcc in the command line, you may encounter an error saying cl.exe is not present in PATH.
1 | nvcc fatal : Cannot find compiler 'cl.exe' in PATH |
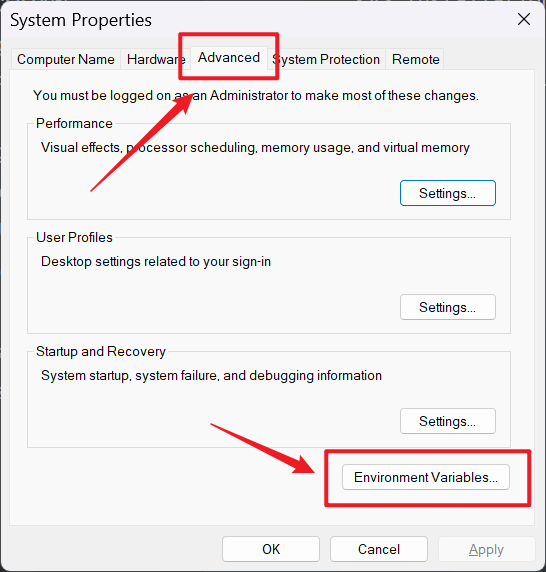
This is because nvcc relies on Clang for compilation. All you need is to add it to your system path. Well, in 1.2, you’ve installed Clang with Visual Studio, but it’s private to VS and other programs won’t be able to see it. So you have to add it to the system Path.
The location for Clang is as follows, somewhere under your Visual Studio installation path. The version number (14.41.33901) may vary for different versions of Visual Studio.
1 | <VS Installation Path>\VC\Tools\MSVC\14.41.33901\bin\Hostx64\x64\ |
Then, add the full path to the system path. You can create a new variable or directly add it to Path, both are OK.
After you set the environment variable, restart your terminal, and try again. This time everything should work as expected.
You can use Ctrl + R to open Run and use sysdm.cpl to quickly launch System Properties dialog.
If you don’t want to add such a path variable, you can also refer to the solution for the next problem just below.
Access Violation
Another common problem is that nvcc reports an ACCESS_VIOLATION error of cudafe++. This may happen if you use the Developer PowerShell or Developer Command Prompt in Visual Studio.
1 | nvcc error : 'cudafe++' died with status 0xC0000005 (ACCESS_VIOLATION) |
This is tricky, for there’s no plain information telling us what is going on, and just no one on the Internet mentioned Visual Studio for this problem. Though there are some hints.
The reason for this is that you’re trying to run x64 nvcc with a x86 cl.exe. What the? Well, let’s check it out. Here we use our lovely where.exe to locate the cl.exe.
1 | PS:> where.exe cl |
Gotcha, the x86 version is ahead of x64, which caused nvcc to call that one instead. The solution is simple, but not elegant, which is manually adding -ccbin flag for nvcc.
1 | nvcc .\demo.cu -ccbin "E:\IDE\Microsoft Visual Studio\2022\VC\Tools\MSVC\14.41.33901\bin\Hostx64\x64\cl.exe" |
Yeah, an obvious solution, although a little verbose. So, you can make it a batch script.
This is a handy job, so I just recommend using VS project or CMake to manage your CUDA project.
Epilogue
What takes you so long, adventurer? Isn’t it great to get started with CUDA? Now you can unleash the power of your GPU!😆ᓚᘏᗢ
 WeChat


